
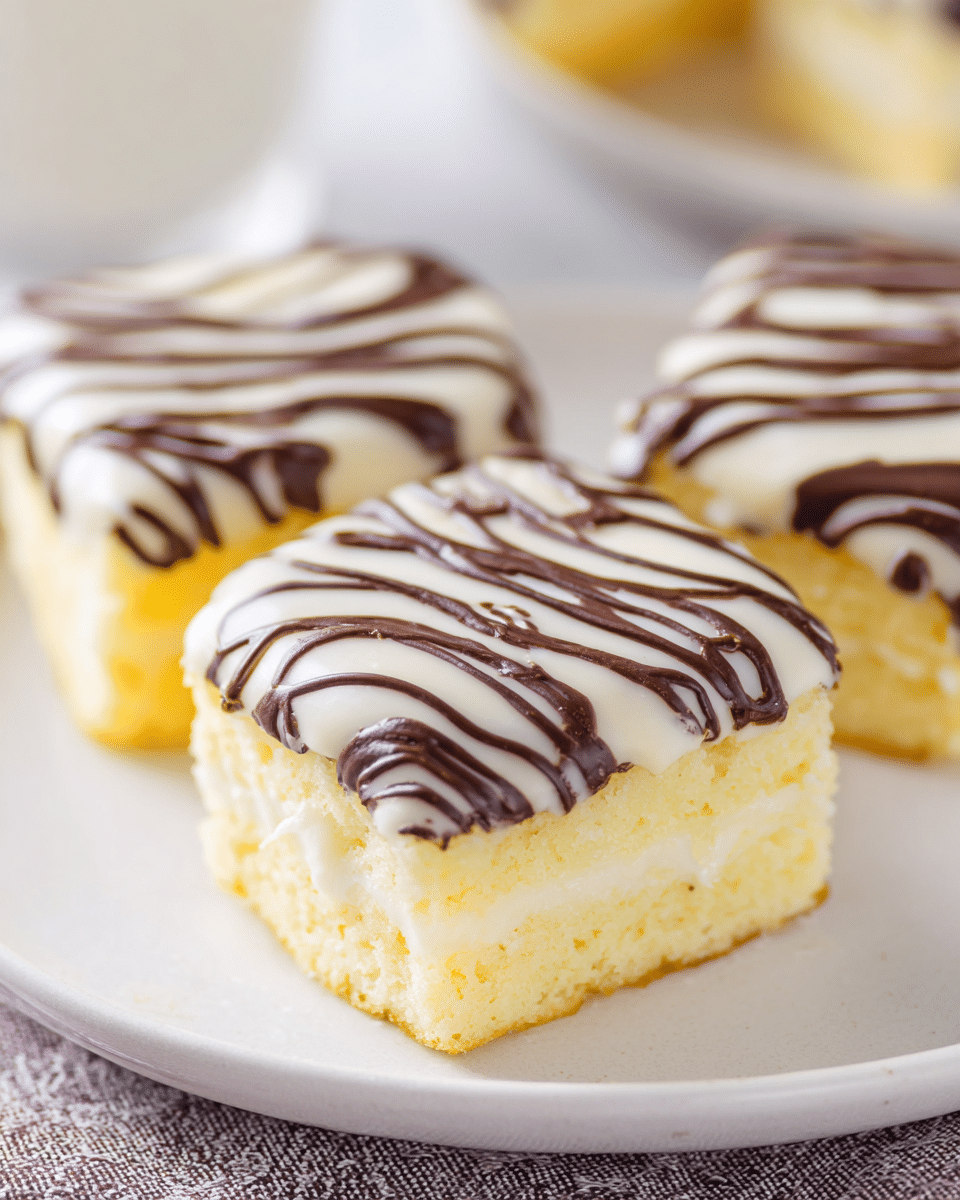
There’s something incredibly nostalgic about biting into a fluffy, cream-filled Zebra Cake especially when you’ve made it yourself. This copycat version delivers all the joy of the store-bought original, but with a rich homemade flavor that’s second to none. Each tender yellow cake sandwich is filled with sweet vanilla buttercream, then dipped in silky almond bark and drizzled with chocolate to create that signature zebra stripe.
These are the ultimate treat for birthday parties, holiday trays, or just to relive a childhood favorite. They’re surprisingly easy to make thanks to a boxed cake mix shortcut, and your family (especially the kids!) will love helping with the dipping and decorating. Whether you’re baking for nostalgia or discovering them for the first time, these Zebra Cakes are a guaranteed hit.
Full Recipe:
Ingredients:
Cake:
-
1 box yellow cake mix (15 oz)
-
¾ cup milk
-
½ cup unsalted butter, melted
-
1 tsp vanilla extract
-
3 eggs
-
1 egg yolk
Buttercream Filling:
-
½ cup unsalted butter, softened
-
1 tsp vanilla extract
-
3 cups powdered sugar
-
3 tbsp milk
Coating:
-
24 oz vanilla almond bark
-
½ cup semi-sweet chocolate chips
Directions:
-
Preheat oven to 350°F (175°C). In a large mixing bowl, combine yellow cake mix, milk, melted butter, vanilla extract, eggs, and egg yolk. Beat until smooth.
-
Line a 9×13-inch baking dish with parchment paper and spray with non-stick spray. Pour in the batter and spread evenly.
-
Bake for 25–30 minutes, or until a toothpick inserted in the center comes out clean. Let the cake cool for 15 minutes.
-
Flip cake onto a clean parchment-lined tray and gently press down with the baking dish. Allow to cool completely, then freeze for 1 hour.
-
While the cake chills, prepare the buttercream. Beat softened butter until fluffy. Add vanilla, then gradually add powdered sugar. Beat for 3–5 minutes. Add milk and beat until smooth. Transfer to a piping bag.
-
Once the cake is frozen, cut into 3-inch circles. Slice each horizontally and pipe buttercream onto one half. Press the top layer back on to form a sandwich. Return to freezer.
-
Melt vanilla almond bark in a microwave-safe bowl in 30-second intervals, stirring each time. Melt chocolate chips in a separate bowl and transfer to a small zip-top bag with the corner snipped.
-
Dip cake sandwiches in almond bark to coat all sides, using a spoon to pour over the top. Let harden.
-
Drizzle with melted chocolate to create zebra stripes. Allow to set fully before serving.
Prep Time: 30 minutes | Cooking Time: 30 minutes | Total Time: 2 hours
Kcal: 586 kcal | Servings: 10 servings
Homemade Copycat Zebra Cakes: A Nostalgic Treat Reimagined
Few snacks capture the essence of childhood quite like the iconic Zebra Cake. With its tender layers of yellow cake, rich buttercream filling, glossy white coating, and signature chocolate stripes, it’s no wonder Little Debbie’s Zebra Cakes have remained a lunchtime favorite for generations. But there’s something magical about recreating that same indulgent treat at home. With this copycat version, bakers can relive fond memories or introduce a new generation to a retro favorite with a recipe that’s both accessible and rewarding.
The Nostalgia Factor
There’s a reason why so many of us get excited when we see a Zebra Cake. For many, these individually wrapped treats were tucked into lunchboxes, offered as after-school rewards, or hidden in the pantry for a secret snack. They were bite sized pieces of happiness. Part of the Little Debbie legacy, Zebra Cakes brought together the flavors and textures that made snack cakes so memorable: fluffy cake, creamy filling, and just enough chocolate to feel indulgent.
Recreating these at home offers more than just a baking project it taps into that emotional memory. And unlike the store-bought versions, the homemade rendition allows for higher-quality ingredients, more control over sweetness, and a touch of creativity. It’s a delightful reminder that food can be both comforting and personal.
Why Make Zebra Cakes from Scratch?
While picking up a box of Zebra Cakes from the store is certainly convenient, there are many reasons to go the homemade route:
-
Better Flavor
Using real butter, pure vanilla extract, and fresh eggs elevates the flavor significantly. The cake becomes richer, the filling more decadent, and the chocolate coating far more satisfying. -
Customization Options
Homemade cakes allow for endless customization. Want a chocolate sponge instead of yellow cake? Prefer a fruity filling like raspberry buttercream? Craving a white chocolate drizzle instead of semi-sweet? It’s all possible. -
No Preservatives
Store-bought snack cakes rely on preservatives to extend shelf life. When you make them at home, you eliminate unnecessary additives and enjoy fresher, more wholesome treats. -
Fun for Families
Baking Zebra Cakes is an activity kids and adults can enjoy together. From mixing the batter to piping the filling to drizzling chocolate stripes, it’s a tactile, interactive way to create memories in the kitchen.
Creative Variations to Try
The beauty of this recipe lies in its versatility. Here are some creative ways to put your own spin on these classic snack cakes:
-
Flavor the Buttercream: Try adding cocoa powder for a chocolate cream center, or fruit puree like strawberry or raspberry for a tangy twist. You could even incorporate a bit of peanut butter for a nutty surprise.
-
Change the Cake Base: While yellow cake is the classic choice, a chocolate sponge or even a red velvet version can bring a fun and unexpected flavor.
-
Holiday-Themed Versions: Make green and red striped cakes for Christmas, orange drizzles for Halloween, or pastel shades for spring holidays. Use food coloring in the almond bark or drizzle to make them festive.
-
Add Crunch: Mix crushed cookies, chopped nuts, or even mini chocolate chips into the filling or on top of the cakes for texture.
-
Mini or Jumbo: Vary the size! Use a smaller cookie cutter for bite-sized Zebra Cakes or go big and serve them as full-size dessert cakes at parties.
Serving Suggestions
Once you’ve finished assembling and decorating your homemade Zebra Cakes, you’ll find they’re as versatile in presentation as they are in flavor. Here are a few ideas:
-
Lunchbox Treats: Wrap individual cakes in parchment or wax paper and tuck them into lunchboxes for a nostalgic surprise.
-
Party Platters: Arrange a variety of flavor variations on a dessert board for gatherings. They look particularly fun stacked like a pyramid or lined up in a zigzag shape.
-
DIY Decorating Station: Let kids (or guests) decorate their own Zebra Cakes with colored drizzles, sprinkles, or candy toppings.
-
Elegant Dessert Plates: Serve these cakes plated with a drizzle of raspberry coulis or a dusting of powdered sugar for an upscale dessert that still nods to childhood fun.
Tips for Success
Creating a bakery-style Zebra Cake at home may sound complicated, but with a few tips, you’ll nail it every time:
-
Freeze the Cake Layers Before Assembling: Freezing the baked cake makes it easier to cut clean circles and assemble without crumbling. It also helps keep the filling from melting when dipped in coating.
-
Use Quality Chocolate and Almond Bark: The flavor of the outer shell is key to replicating the original taste. Avoid waxy or overly sweet coatings; a good-quality almond bark or white chocolate will make all the difference.
-
Don’t Skip the Piping Bag: Applying the buttercream with a piping bag ensures even distribution, better structure, and less mess than spooning it on.
-
Let the Coating Set Fully: Be patient and allow the almond bark to harden completely before serving or storing. This preserves the visual appeal and ensures that each bite has that satisfying crunch.
-
Use a Smooth Work Surface for Decorating: Parchment-lined trays are perfect for assembling and cooling the dipped cakes. They also prevent sticking and make clean-up easier.
Storage & Make-Ahead Options
These Copycat Zebra Cakes are not only adorable and delicious they’re also surprisingly easy to store. Once the chocolate has fully hardened, you can place them in an airtight container and keep them at room temperature for up to 4 days. For slightly longer freshness, store them in the fridge, especially in warmer climates.
Planning ahead? Freeze the finished cakes (wrapped individually in plastic wrap and placed in a sealed container) for up to 3 months. They’ll thaw beautifully in the fridge or at room temperature just note that some condensation may appear, which doesn’t affect taste or texture.
If you’d rather break up the process, bake the cake a day in advance and freeze it. The filling and dipping can be done when you’re ready, making this a great make-ahead dessert for busy schedules.
The Joy of Homemade, Reimagined
Recreating Copycat Zebra Cakes is more than just baking a dessert it’s about reconnecting with joyful memories and bringing that joy into the present. It’s about slowing down to make something from scratch, something playful and familiar. Whether you’re baking for your kids, your friends, or just yourself, these cakes offer a delicious escape from the everyday.
What’s even more fulfilling is the sense of accomplishment that comes from seeing those signature chocolate stripes on a dessert you crafted by hand. It reminds us that some of the best treats aren’t found in a box on a shelf they’re made in our own kitchens, with a little time, a lot of love, and a dash of nostalgia.
Conclusion:
Homemade Copycat Zebra Cakes are a perfect blend of old-school charm and modern creativity. They bring the familiar comfort of a childhood snack into the realm of from-scratch baking, allowing you to enjoy a better tasting, customizable version of a classic favorite. Whether you stick with the traditional yellow cake and vanilla buttercream or branch out with creative flavors and festive twists, one thing’s for sure: these little cakes will spark smiles and sweet memories with every bite.
So go ahead gather your ingredients, warm up your oven, and unleash your inner child. There’s never been a better time to rediscover the simple joy of Zebra Cakes, made with heart and homemade flair.