
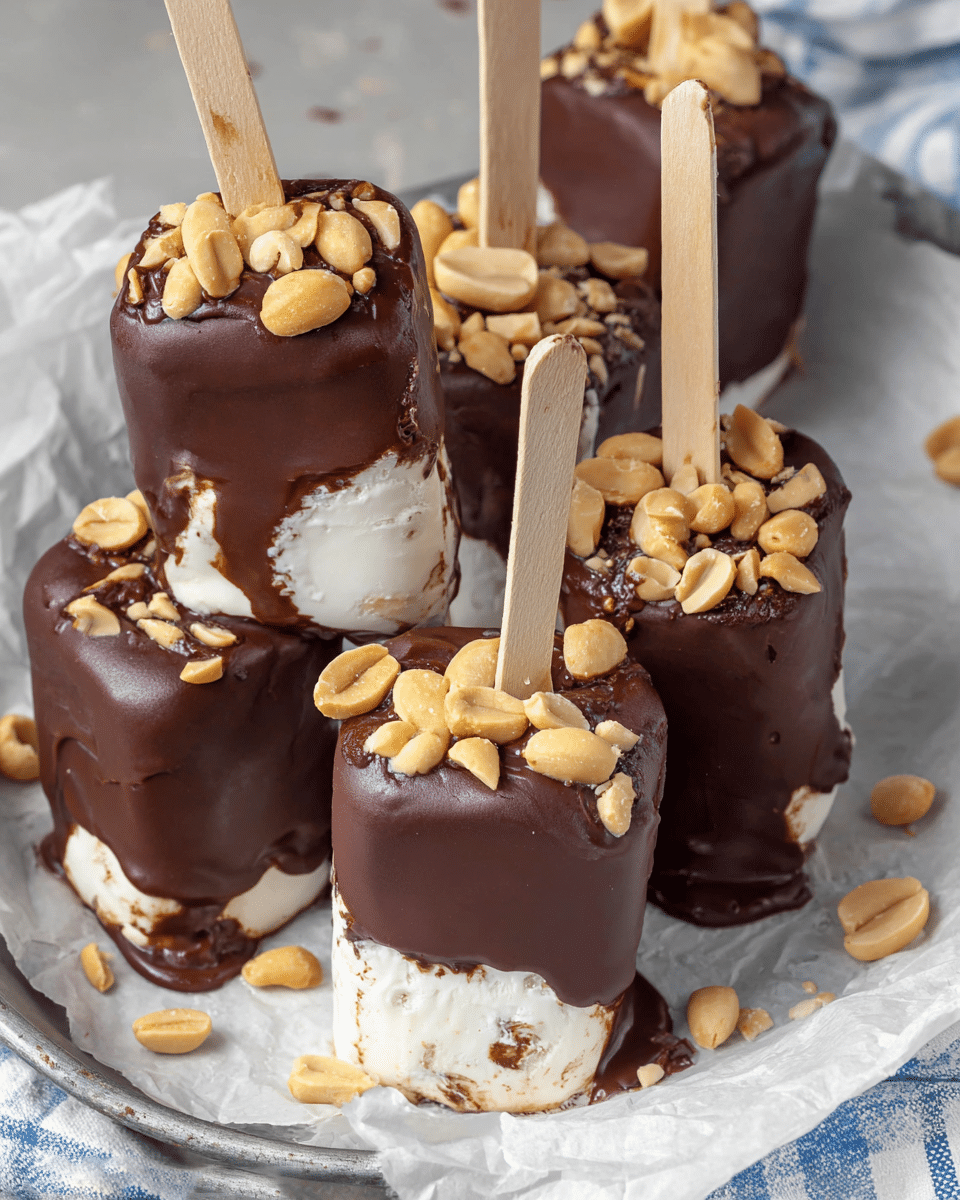
The Buster Bar Ice Cream Pops bring the nostalgic delight of Dairy Queen right into your kitchen. Layers of creamy vanilla bean ice cream, crunchy salted peanuts, and rich hot fudge are stacked inside individual cups, then dipped in a luscious chocolate shell for that signature crunch.
These frozen treats are a crowd-pleaser and perfect for parties, cookouts, or a fun kitchen project with kids. With just a handful of ingredients and no baking required, you can make this iconic summer dessert at home in just a few simple steps no drive thru necessary!
Full Recipe:
Ingredients:
-
1/2 Gallon Vanilla Bean Ice Cream
-
3/4 cup Salted Peanuts
-
1 Jar Hot Fudge Sauce (approx. 12 oz)
-
12 oz Semi-Sweet Chocolate Chips
-
1 tbsp Vegetable Oil
Directions:
-
Add 1 teaspoon of salted peanuts into the bottom of each small plastic cup.
-
Spoon vanilla ice cream on top and press it down firmly to pack the layer.
-
Add 1 tablespoon of hot fudge sauce over the ice cream and spread evenly.
-
Repeat the layers: peanuts, ice cream, and hot fudge. Press each layer down firmly.
-
Top with a final sprinkle of peanuts and insert a popsicle stick into the center.
-
Place the cups on a parchment-lined baking sheet and freeze for 2–3 hours until solid.
-
Melt chocolate chips with vegetable oil in a microwave-safe cup tall enough for dipping. Heat in 30-second intervals, stirring until smooth.
-
Remove frozen bars from cups by gently squeezing or dipping in cool water.
-
Dip each bar into the melted chocolate, coating completely. Let excess chocolate drip off.
-
Place dipped bars back on parchment-lined tray and freeze for 30–60 minutes until set.
Prep Time: 20 minutes | Freeze Time: 3 hours | Total Time: 3 hours 20 minutes
Kcal: 1305 kcal | Servings: 6
Homemade Buster Bars: The Nostalgic Summer Treat That Never Goes Out of Style
There’s something undeniably magical about a frozen dessert that combines creamy vanilla ice cream, crunchy peanuts, rich hot fudge, and a crisp chocolate shell. For many, the Dairy Queen Buster Bar has been a summer staple a nostalgic treat from childhood trips to the local DQ. The combination of textures and flavors, served conveniently on a stick, evokes memories of carefree sunny days and simple indulgences.
Now, thanks to clever home cooks and creative copycat recipes, you can enjoy this iconic frozen dessert right from your own freezer without ever waiting in a drive-thru line. Whether you’re making them for your family, a weekend party, or just because you need a chocolate fix, homemade Buster Bars are a fun, impressive treat to prepare that packs all the classic flavors you remember.
A Brief History of the Buster Bar
Dairy Queen has long been known for its frozen confections, but few are as uniquely satisfying as the Buster Bar. First introduced in the 1960s, the Buster Bar was a step up from the simple Dilly Bar. While the Dilly Bar features soft-serve ice cream dipped in a chocolate shell, the Buster Bar took things further by layering peanuts and hot fudge between layers of ice cream, then freezing it all into a cup and finishing with a decadent chocolate coating.
It quickly became a fan favorite not just for its delicious taste, but also because of how indulgent and unique it felt compared to other ice cream novelties. Part ice cream sundae, part chocolate bar, and entirely crave-worthy, the Buster Bar has endured through generations of Dairy Queen lovers.
Why This Copycat Recipe Works So Well
One of the biggest reasons the homemade version of this recipe is so popular is its simplicity and accessibility. While it replicates the original flavor and texture of the DQ classic, it doesn’t require any special machines or tools. Everything is made using common kitchen staples: plastic cups, a baking sheet, a microwave, and a freezer.
The step-by step layering technique starting with peanuts, followed by ice cream, fudge, more peanuts, and more ice cream recreates the original structure beautifully. And once it’s frozen solid and dipped in melted chocolate, you get that same satisfying crack with your first bite, followed by velvety creaminess and a rich peanut crunch.
What also makes this recipe shine is its customizability. You can easily adapt it to fit dietary needs, personal preferences, or creative flair, which we’ll get into more below.
The Texture and Flavor Combo Everyone Loves
One of the defining characteristics of the Buster Bar is the interplay of multiple textures. The smooth and creamy vanilla ice cream forms the base and contrasts beautifully with the crunch of salted peanuts. The hot fudge adds a gooey, rich center that oozes slightly when you bite into it especially if you let the bar sit for a few minutes before enjoying. Then there’s the chocolate coating: that thin, firm shell that cracks when you bite, giving way to the soft interior.
From a flavor perspective, it hits all the right notes: sweet, salty, nutty, creamy, and chocolaty. It’s the kind of treat that satisfies both kids and adults alike, especially those who love a good sweet-and-salty combination.
Easy Variations to Try
One of the great things about this recipe is how easily adaptable it is to different tastes and dietary needs. Here are some fun variations to consider when making your own Buster Bars at home:
-
Nut-Free: Replace the peanuts with crushed Oreos, chopped pretzels, toffee bits, or granola. You still get a crunch, but without the allergens.
-
Chocolate Lovers’ Dream: Use chocolate ice cream instead of vanilla, and consider adding chocolate syrup or Nutella between layers.
-
Caramel Swirl: Add a drizzle of caramel sauce between the layers for a sweet and buttery twist.
-
Peanut Butter Power: Mix a swirl of peanut butter into the ice cream or use peanut butter chips for extra nuttiness.
-
Candy Explosion: Add mini M&Ms, crushed candy bars, or cookie chunks to the layers for a fun and colorful surprise.
-
Vegan/Dairy-Free: Use a non-dairy ice cream (like coconut milk or oat milk-based varieties), dairy-free chocolate chips, and omit the hot fudge or use a vegan version.
The possibilities are endless, and every variation still delivers a delicious frozen dessert that feels like a special treat.
Tips for Perfect Homemade Buster Bars
-
Pack the layers firmly: Use a spoon to press down each layer as you build the dessert in the cup. This prevents gaps and ensures your popsicle stick stays in place.
-
Let the bars freeze solid: For best results, freeze for at least 3 hours or overnight before dipping in chocolate. This ensures they hold their shape and don’t melt during coating.
-
Work quickly during dipping: Have your melted chocolate ready and slightly cooled so it doesn’t melt the ice cream. A tall cup or glass makes dipping easier and more even.
-
Use parchment paper: After dipping, place each bar on a parchment-lined tray to avoid sticking and to catch drips.
-
Don’t overfill the cups: Stick to about two layers of each ingredient to keep the bars manageable and well-balanced.
Storage and Make-Ahead Tips
These bars are perfect for prepping ahead. Once dipped and set, transfer them to a freezer-safe bag or container. They’ll keep well for up to two weeks, although they rarely last that long in our house!
To prevent freezer burn, wrap each bar individually in plastic wrap before placing them in an airtight container. This also makes them easier to grab and go when you need a quick dessert or want to hand one off to a friend or neighbor.
Serving Suggestions
Homemade Buster Bars are ideal for:
-
Birthday parties: Kids and adults alike will love the novelty and indulgence.
-
Summer barbecues: A cold treat on a hot day? Yes, please.
-
Holiday dessert trays: Serve them as part of a larger frozen dessert platter.
-
DIY Ice Cream Night: Let everyone customize their own layers and toppings.
They’re also a great addition to ice cream cakes or sundaes just chop one up and serve over more ice cream with whipped cream and a cherry on top.
Conclusion:
Making homemade Buster Bars is more than just a fun recipe it’s a way to bring a bit of nostalgia and joy into your kitchen. Whether you remember enjoying these as a kid or you’re discovering them for the first time, the combination of creamy, crunchy, sweet, and salty makes them a standout dessert.
Best of all, this copycat version gives you the flexibility to tweak, twist, and reinvent the classic to suit your personal tastes or dietary needs. With minimal ingredients and tools, you can create something that feels special but is actually quite simple to prepare.
So next time you’re craving a cool and chocolaty treat, skip the drive-thru and head to your kitchen. These homemade Buster Bars are bound to become a favorite in your freezer and in your family’s hearts.