
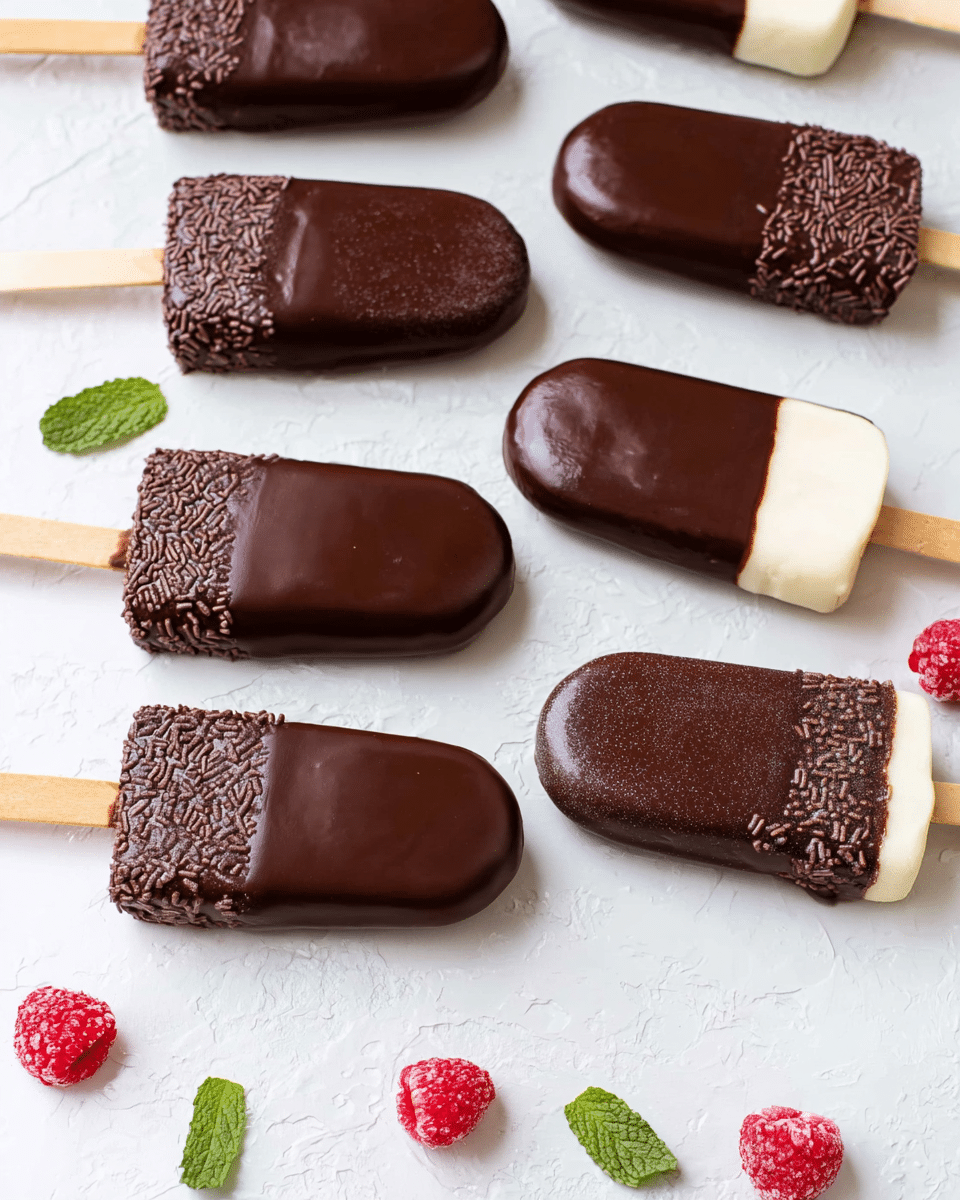
The combination of soft, moist vanilla cake crumbs and creamy buttercream, encased in a smooth layer of white chocolate, makes these cakesicles an irresistible dessert. The playful dark chocolate drizzle and colorful sprinkles add a festive touch, making them perfect for any celebration.
These cakesicles are not only delicious but also fun to make and decorate. You can customize them with different colors, drizzle patterns, and toppings to match the theme of your party. They store well, making them a great make-ahead treat for birthdays, holidays, or any sweet occasion.
Full Recipe:
Ingredients:
-
2 cups vanilla cake crumbs (from baked and cooled cake)
-
1/2 cup buttercream frosting
-
12 oz white chocolate, melted
-
4 oz dark chocolate, melted
-
Sprinkles for decoration
-
Cakesicle sticks
Directions:
-
Crumble the cooled vanilla cake into a large mixing bowl until you have fine crumbs.
-
Add buttercream frosting gradually, mixing with a spoon or hands until the mixture is moist enough to hold its shape when pressed.
-
Press the cake mixture into cakesicle molds, inserting sticks into each one. Flatten the backs for a smooth finish.
-
Freeze the filled molds for 20–30 minutes to firm up.
-
Remove cakesicles from molds and dip them into melted white chocolate, tapping gently to remove excess.
-
Place on parchment paper and drizzle with melted dark chocolate for contrast.
-
Decorate immediately with sprinkles before the coating sets.
-
Let them set completely before serving or packaging.
Prep Time: 20 minutes | Cooking Time: 0 minutes | Total Time: 50 minutes
Kcal: 210 kcal | Servings: 12 cakesicles
Chocolate-Dipped Vanilla Cakesicles: The Perfect Party Treat
Chocolate-Dipped Vanilla Cakesicles are a delightful twist on traditional cake pops, combining the nostalgic comfort of moist vanilla cake with the elegance of a sleek chocolate coating. These handheld desserts not only taste incredible but also have a beautiful, polished appearance that can easily be adapted for any occasion. Whether you’re hosting a birthday party, a wedding reception, a baby shower, or simply enjoying a weekend baking project, these treats are guaranteed to impress.
The concept of cakesicles is simple: instead of forming cake into small round pops on lollipop sticks, you mold the cake mixture into popsicle-shaped treats. The result is a slightly larger dessert, offering more cake per bite and a wider surface for creative decoration. By using a silicone cakesicle mold, you can achieve a smooth, professional finish that makes them look like they came straight from a high-end bakery.
Why Cakesicles Are Trending
Over the past few years, cakesicles have surged in popularity across social media platforms. Their aesthetic appeal makes them ideal for sharing on Instagram, TikTok, and Pinterest. They offer a modern, refined alternative to traditional cake pops, with a shape that’s easy to decorate and a size that’s more satisfying for guests.
The versatility of cakesicles is one of their biggest strengths. While the recipe here features classic vanilla cake coated in white chocolate and drizzled with dark chocolate, the possibilities are endless. You can experiment with different cake flavors like red velvet, lemon, chocolate fudge, or funfetti, as well as various coatings and decorations. This adaptability means cakesicles can be themed for holidays like Christmas, Easter, Valentine’s Day, or Halloween by simply adjusting colors and toppings.
The Perfect Balance of Flavor and Texture
The heart of a great cakesicle lies in its filling. Vanilla cake provides a light, buttery sweetness that pairs beautifully with the smooth richness of chocolate. The buttercream binds the cake crumbs together, giving the interior a moist, truffle-like texture. Unlike a traditional slice of cake, the filling in a cakesicle is denser, making it feel more indulgent.
The chocolate coating adds a satisfying snap when you bite into it, contrasting with the soft, creamy cake inside. In this version, the use of white chocolate offers a creamy sweetness that complements the vanilla perfectly, while the dark chocolate drizzle adds a hint of bitterness to balance the flavors.
If you prefer a less sweet coating, you could opt for semi-sweet or bittersweet chocolate instead of white chocolate. On the other hand, if you love a candy-sweet finish, try coating them in pastel-colored candy melts for a whimsical look.
Decoration and Presentation Ideas
Presentation is where cakesicles truly shine. Their flat surface makes them ideal for creative decorations:
-
Drizzle Designs: Use a piping bag or spoon to drizzle dark, milk, or colored chocolate in zig-zags, waves, or geometric lines.
-
Sprinkle Magic: Add sprinkles, edible glitter, or small sugar pearls while the coating is still wet. This works especially well for festive occasions.
-
Edible Gold or Silver Leaf: For upscale events, tiny accents of edible metallic leaf instantly elevate the look.
-
Fondant Details: Cut out small fondant shapes like flowers, hearts, or stars to press onto the surface.
-
Themed Colors: Match the chocolate and decorations to event colors pastel pink for a baby shower, bold red and green for Christmas, or black and orange for Halloween.
When arranging cakesicles for serving, you can stand them upright in decorative containers filled with rice or sugar, lay them flat on a tiered dessert stand, or individually wrap them in cellophane bags tied with ribbons for a takeaway favor.
Storage and Make-Ahead Tips
One of the best things about cakesicles is how well they store. If you’re preparing for a big event, you can make them in advance to reduce stress on the day.
-
Room Temperature: If eaten within 24 hours, they can be stored in an airtight container at room temperature.
-
Refrigerator: For longer storage (up to 5 days), keep them in the fridge. The chocolate coating helps lock in freshness, but be aware that condensation may form when bringing them back to room temperature.
-
Freezer: You can freeze cakesicles for up to 2 months. Wrap each one individually in plastic wrap, then place them in a freezer-safe container. Thaw in the refrigerator before serving.
Avoid leaving cakesicles in warm environments for extended periods, as the chocolate coating can melt or bloom (develop a whitish coating from cocoa butter separation).
Creative Flavor Variations
While the classic vanilla and white chocolate combination is timeless, there’s a whole world of flavor combinations to explore:
-
Chocolate Overload: Chocolate cake crumbs mixed with chocolate buttercream, coated in dark chocolate.
-
Red Velvet Elegance: Red velvet cake with cream cheese frosting, coated in white chocolate with a red drizzle.
-
Funfetti Delight: Vanilla cake with rainbow sprinkles in the batter, coated in pastel-colored chocolate.
-
Citrus Twist: Lemon cake with lemon buttercream, coated in white chocolate and topped with candied lemon peel.
-
Mocha Indulgence: Coffee-flavored cake with espresso buttercream, coated in milk chocolate.
You can also add flavor extracts or liqueurs to the cake mixture for an adult-friendly twist, like almond extract, rum, or orange liqueur.
Why These Make the Perfect Party Dessert
Cakesicles have several qualities that make them ideal for gatherings:
-
Portion Control: Each cakesicle is a single serving, making it easy to manage quantities and prevent waste.
-
Mess-Free: Guests can hold the stick and enjoy without needing plates or utensils.
-
Photo-Worthy: Their beautiful presentation makes them a centerpiece-worthy dessert.
-
Customizable: Easy to adapt to dietary needs use gluten-free cake, dairy-free chocolate, or vegan frosting.
-
Kid-Friendly: Children love helping with decoration, and the size is perfect for little hands.
They’re also a wonderful option for dessert tables, where variety is key. Cakesicles can sit alongside cupcakes, macarons, and cookies, adding both visual variety and flavor diversity.
Tips for Success
If you’re new to making cakesicles, here are some tips to ensure a flawless result:
-
Chill Before Coating: Freezing the filled molds helps the cakes hold their shape when dipping.
-
Thin the Chocolate: If your melted chocolate is too thick, add a small amount of vegetable shortening or coconut oil for a smoother dip.
-
Avoid Overfilling: Press the cake mixture firmly but avoid overpacking it should be compact but not too dense.
-
Use High-Quality Chocolate: The coating is a big part of the flavor, so choose a chocolate you enjoy eating on its own.
-
Work in Batches: If making a large quantity, work with a few cakesicles at a time so the chocolate doesn’t set before you decorate.
Conclusion:
Chocolate-Dipped Vanilla Cakesicles strike the perfect balance between elegance and fun. They’re as enjoyable to make as they are to eat, offering endless opportunities for personalization and creativity. Their rich vanilla cake filling, luscious chocolate shell, and customizable decoration make them suitable for everything from casual get-togethers to formal celebrations.
The beauty of cakesicles lies not only in their taste but also in their presentation. With just a little imagination, you can transform them into themed treats that reflect the spirit of any event. Whether you keep it simple with a smooth coating and delicate drizzle or go all out with vibrant colors and intricate designs, cakesicles are guaranteed to delight your guests.
If you’re looking for a dessert that combines the comfort of cake with the elegance of fine confectionery, these Chocolate-Dipped Vanilla Cakesicles are your go-to choice. They’re proof that sometimes, the most delightful creations come in small yet stylish packages.