
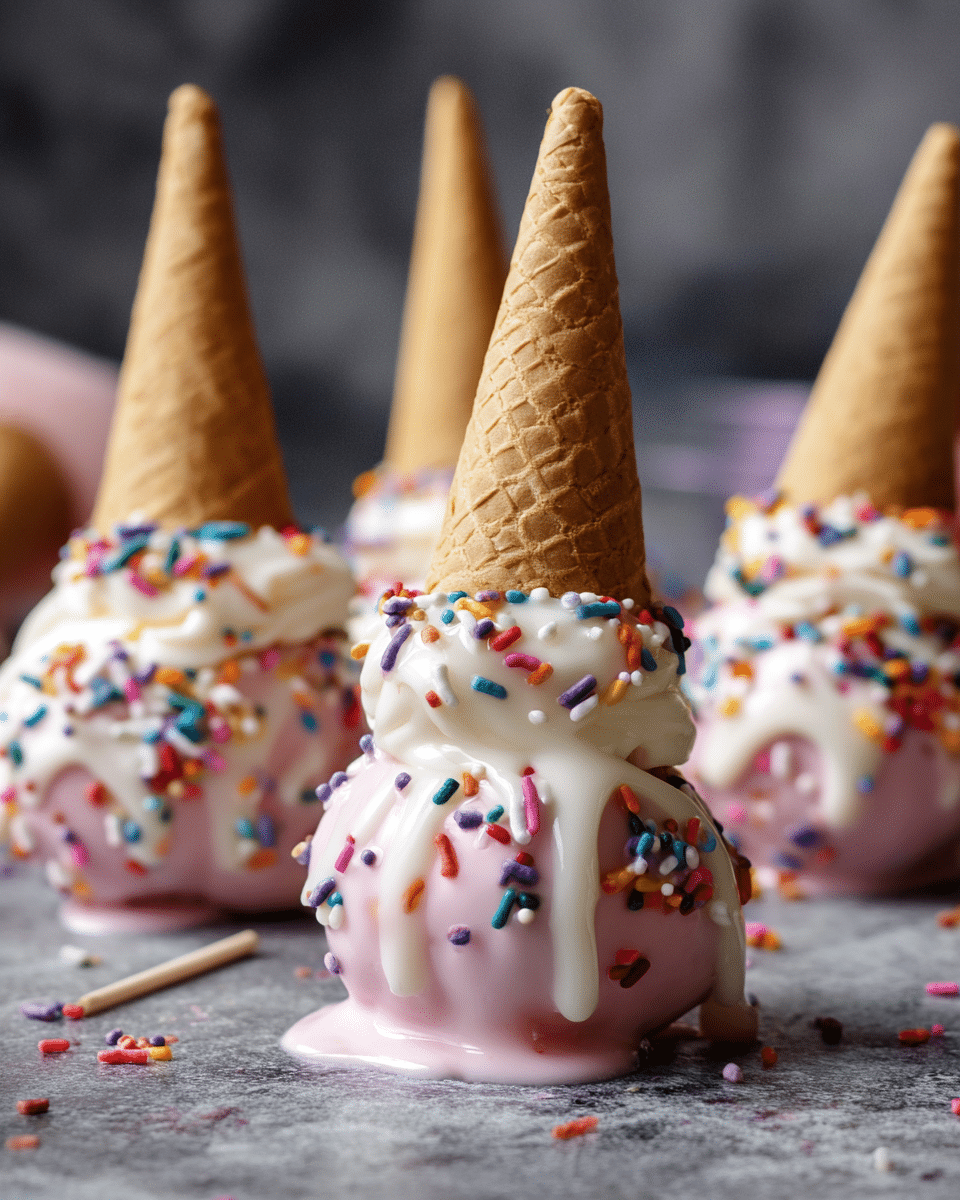
The Melting Ice Cream Cone Cake Pops are a playful twist on classic cake pops combining the creamy sweetness of vanilla butter cake with a crunchy waffle cone and a shell of vibrant candy coating. These treats are perfect for birthdays, baby showers, or just making a summer day a bit more magical.
With their “melting” aesthetic, you don’t need perfection to make them beautiful. The layered textures soft cake, rich frosting, and crisp candy shell deliver an unexpectedly delightful bite every time. Plus, they’re endlessly customizable with your favorite colors and sprinkle combinations.
Full Recipe:
Ingredients:
For the Vanilla Butter Cake:
-
2 cups + 2 tablespoons cake flour
-
2 teaspoons baking powder
-
½ teaspoon sea salt
-
¾ cup unsalted butter, room temperature
-
¾ cup granulated sugar
-
¾ cup light brown sugar
-
3 large eggs, room temperature
-
2 tablespoons vegetable or avocado oil
-
1 tablespoon pure vanilla extract
-
1 cup whole milk, room temperature
For Assembly:
-
1 cup vanilla buttercream (or marshmallow frosting)
-
½ cup rainbow jimmies or sprinkles
-
12 oz candy melts (any color; pink is popular)
-
36–48 waffle cones (cut in half)
Directions:
-
Preheat oven to 325°F (165°C). Grease and flour a 9×13” pan.
-
Sift and whisk flour, baking powder, and salt in a medium bowl.
-
Cream butter, sugar, and brown sugar until fluffy (2–3 min).
-
Add eggs one at a time, beating well between each. Add oil and vanilla; mix to combine.
-
Add flour in two parts, alternating with milk, mixing just until combined.
-
Pour into pan and bake for 35–40 minutes or until a toothpick comes out with moist crumbs. Cool completely.
-
Once cool, crumble the cake into fine crumbs in a bowl.
-
Add frosting and sprinkles; stir until combined. If needed, add extra frosting for binding.
-
Use a cookie scoop to form balls, then chill for 1 hour.
-
Trim cones with a serrated knife to fit cake balls.
-
Dip cone rims in melted candy melts and attach to cake balls. Chill until firm.
-
Dip cake balls in candy melts to coat fully. Place upside down on parchment.
-
Decorate with sprinkles while candy is still wet. Chill to set completely.
Prep Time: 35 min | Bake Time: 40 min | Chill Time: 2 hrs | Total Time: 4 hr 15 min
Kcal: Approx. 180 kcal per pop | Servings: 36–48 pops
Melting Ice Cream Cone Cake Pops: The Cutest Dessert You Didn’t Know You Needed
If there were ever a dessert that could instantly make people smile, it’s the Melting Ice Cream Cone Cake Pop. These playful treats look like upside-down scoops of melting ice cream but are actually delicious, candy-coated cake balls perched atop mini waffle cones. They’re charming, nostalgic, festive, and best of all deceptively easy to make, even if you’re not a professional baker.
These cake pops aren’t just for show they’re incredibly tasty too. With their combination of moist vanilla cake, creamy frosting, crunchy candy shell, and a crisp waffle cone base, every bite delivers a perfect contrast of textures. Whether you’re prepping a tray for a birthday party, summer celebration, baby shower, or a just-because weekend bake-a-thon, this dessert is guaranteed to steal the spotlight.
Where the Inspiration Began
The idea for these cake pops came from a moment of practical creativity. Originally part of a tiny smash cake design for a child’s birthday party, the creator needed a miniature ice cream cone to complete the melting ice cream illusion. Instead of ordering specialized mini cones online and risking breakage during delivery, a simple yet brilliant decision was made to slice standard waffle cones in half. This small pivot led to a bigger one: why not turn the whole concept into cake pops?
The resulting experiment was a success, sparking joy and sugar highs across the party. And just like that, Melting Ice Cream Cone Cake Pops were born adorable, approachable, and instantly loveable.
Why These Cake Pops Are So Special
These aren’t your average cake pops. The genius lies not only in the playful visual an upside down, pastel colored “melting” scoop but also in how surprisingly forgiving the design is. You don’t need perfectly smooth candy coatings or expertly shaped balls. In fact, the messier they look, the better. That’s the whole charm: the “melting” aspect embraces drips, imperfections, and sprinkles gone rogue. It’s whimsy made edible.
But beyond the looks, the taste is where these cake pops really shine. They start with a vanilla butter cake that strikes the right balance between fluffy and flavorful. Add a dash of creamy frosting (vanilla or even marshmallow for a twist), and you have a soft, indulgent center. That’s surrounded by a hard candy melt shell usually pink, but totally customizable which cracks delightfully under the bite. The waffle cone adds a toasted, nutty crunch to finish. It’s like getting a bite of birthday cake, dipped in candy, served in an ice cream cone.
The Perfect Treat for Celebrations
Melting Ice Cream Cone Cake Pops are a showstopper on any dessert table. Their vibrant colors and nostalgic appearance make them a hit at:
-
Children’s Birthday Parties: Their small size, fun shape, and sweet flavor make them a kid-friendly favorite.
-
Baby Showers: Use pastel melts and themed sprinkles to align with your celebration.
-
Summer BBQs or Pool Parties: With their “melting” look, they’re a perfect visual match for warm-weather gatherings.
-
Picnics & Potlucks: No need for forks, knives, or plates these are totally handheld and mess-contained.
-
Holiday Gatherings: Just switch out sprinkle colors or melts to match the season.
Not only are they convenient to serve, they’re also easy to store and make ahead. You can prepare them up to 5 days in advance at room temperature, or even freeze them for longer storage. Just make sure to let them come to room temp before serving, so the coating isn’t compromised by condensation.
Pro Tips for Cake Pop Success
Even though this recipe is very beginner-friendly, a few insider tricks can make the experience smoother:
-
Crumb Consistency is Key: Make sure the crumbled cake is evenly fine. Chunky bits can lead to lopsided pops.
-
Chill to Shape: Chill the cake balls once formed, then re-roll them after a short rest. This gives you smooth, rounded shapes with minimal effort.
-
Don’t Skip the “Glue”: Dipping the waffle cone rim in candy melts before attaching the cake ball ensures a strong bond that won’t fall apart mid-dip.
-
Candy Melt Care: Use a double boiler or microwave in short bursts to avoid overheating. Grainy melts won’t coat well.
-
Decorate Quickly: Have your sprinkles ready the moment you dip, because candy melts set fast. Decorating while still tacky ensures they stick beautifully.
Creative Twists and Variations
The beauty of this recipe is how flexible it is. Here are a few ideas to mix things up:
-
Flavor Swaps: While vanilla is classic, feel free to use funfetti, chocolate, strawberry, or even lemon cake for the base. Just be sure the texture stays soft and fluffy.
-
Frosting Variations: Marshmallow buttercream adds a fun twist. Chocolate or cream cheese frosting can offer deeper flavor notes.
-
Color Combos: Use different candy melt colors to create a rainbow effect for Pride Month, pastel shades for Easter, or red and green for Christmas.
-
Themed Sprinkles: From unicorns and stars to spooky eyes or snowflakes, the options are endless.
-
Mini Pops: For a bite-sized treat, use smaller scoops to roll your cake balls. You’ll get more pops from one batch and they’re even cuter!
Fun Fact: Why Cake Pops Are Still Trending
Cake pops have been around for well over a decade, but they’ve never truly gone out of style and for good reason. They combine the joy of cake with the portability of a lollipop. They’re mess-free, portion-controlled, and easy to share. But more than that, they’re customizable to any theme or occasion.
What makes Melting Ice Cream Cone Cake Pops particularly charming is how they tap into nostalgia. They mimic the feeling of summer, of ice cream trucks, of birthday cakes, and dripping cones on a hot day. They’re cheerful and evoke a playful innocence that appeals to both kids and adults alike.
Troubleshooting Tips
Why are my cake pops falling off the cone?
This usually means the candy melt “glue” wasn’t applied generously or the cake ball wasn’t chilled enough. Chill for at least an hour before assembly.
My candy melts aren’t smooth. What went wrong?
They likely overheated. Try adding a teaspoon of vegetable shortening or coconut oil to help smooth the texture. Keep melts warm over a double boiler while dipping.
Sprinkles sliding off?
Make sure to decorate immediately after dipping. If the candy coating sets too fast, the sprinkles won’t adhere.
How do I store these?
Store in a cool, dry place in an airtight container. If storing in the fridge or freezer, allow time to come to room temperature to avoid condensation.
Conclusion:
Melting Ice Cream Cone Cake Pops are more than just a sweet bite they’re a conversation starter, a mood booster, and a piece of edible art. Whether you’re a seasoned baker or just starting your baking journey, this recipe offers a chance to get creative without stress. They’re forgiving to assemble, endlessly customizable, and sure to draw oohs and aahs from everyone who sees (and tastes) them.
So the next time you need a dessert that’s cute, delicious, and full of personality, skip the standard cake or cupcakes. Reach for this imaginative, crowd pleasing favorite. After all, why serve dessert on a plate when you can serve it in an ice cream cone?